Caulking and sealing is one of the easiest, most cost-effective home improvements you can make. A properly caulked home stays warmer in winter, cooler in summer, and prevents water damage. Here’s how to do it like a pro.
Why Caulk?
- Energy savings: Sealed gaps reduce heating/cooling costs
- Prevents water damage: Stops water from entering walls and causing mold
- Improves comfort: Eliminates drafts
- Increases property value: Shows good maintenance
- Prevents pest entry: Small gaps are common pest entry points
When to Caulk
Common areas needing caulk:
- Around window frames (interior and exterior)
- Around door frames
- Where walls meet baseboards
- Where baseboards meet flooring
- Cracks in walls
- Around plumbing penetrations
- Where exterior siding meets trim
Types of Caulk
Silicone Caulk:
- Most durable (10-20 year lifespan)
- Water resistant
- Paintable (some types)
- Good for bathrooms and kitchens
- Cost: $3-8 per tube
Acrylic Latex Caulk:
- Easy cleanup with water
- Paintable
- Good for interior use
- Less durable than silicone (5-7 years)
- Cost: $1-3 per tube
Polyurethane Caulk:
- Very flexible, great for movement areas
- Excellent for exterior use
- Most durable but harder to work with
- Cost: $5-10 per tube
Hybrid Caulks:
- Combine best properties of silicone and polyurethane
- Cost: $8-15 per tube
Tools and Materials
- Caulk tubes and caulking gun
- Putty knife or caulk smoothing tool
- Scissors or utility knife
- Rubbing alcohol (for cleanup)
- Painter’s tape (optional)
- Gloves and safety glasses
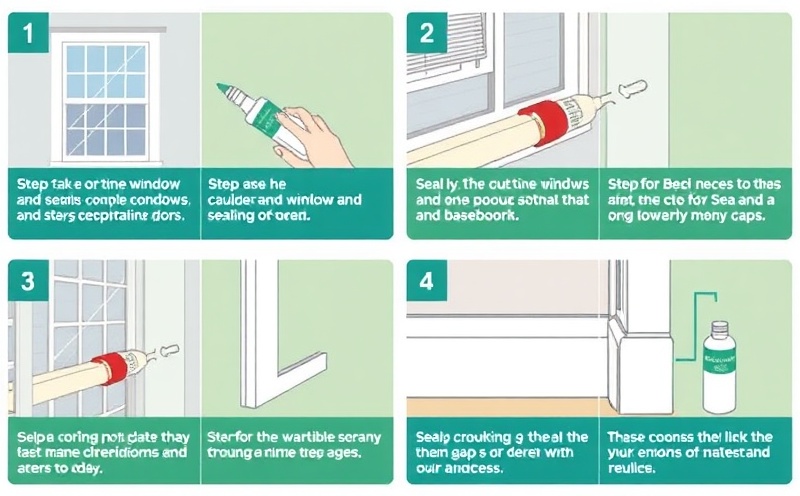
Step-by-Step Caulking Process
Step 1: Prepare the Surface
- Clean out old caulk with a putty knife
- Remove dust, debris, and old sealant
- Wipe with a damp cloth and let dry completely
- Tip: Use rubbing alcohol to remove residue
Step 2: Cut the Caulk Nozzle
- Cut at 45-degree angle
- Make a small hole (larger openings = more caulk)
- Better to start small; you can always go bigger
Step 3: Apply Painter’s Tape (Optional)
- Tape both sides of the gap for clean lines
- Makes removal easier and finish looks neater
Step 4: Load the Gun
- Insert tube into caulking gun
- Push plunger to start flow
Step 5: Apply Caulk
- Hold gun at 45-degree angle
- Use steady, even pressure
- Move smoothly along the gap
- One continuous bead is better than multiple passes
- Fill gaps completely but not excessively
Step 6: Smooth the Caulk
- Use a caulking tool or wet finger
- Smooth immediately while wet
- Creates clean, professional appearance
- Remove tape before caulk fully cures
Step 7: Let Cure
- Most caulks cure in 24-48 hours
- Check manufacturer instructions
- Don’t paint until fully cured
Pro Tips for Perfect Results
- Temperature matters: Apply caulk between 50-85°F
- Wet your tool: Use water or rubbing alcohol on your smoothing tool
- Less is more: Overfilled caulk looks amateurish
- Practice: Do inconspicuous areas first
- Consistent pressure: Maintains even bead thickness
- One motion: Don’t stop and start frequently
Common Mistakes to Avoid
- Applying over dirty surfaces (poor adhesion)
- Wrong caulk type for the location
- Caulking too much or too little
- Painting before caulk cures
- Not removing old caulk first
- Trying to paint bad caulk application
Caulk Removal
To remove old caulk:
- Score along edges with utility knife
- Use putty knife to peel away
- Use caulk removal solution or rubbing alcohol
- Clean thoroughly before new caulk
Cost-Benefit Analysis
- Caulk tubes: $1-15 each
- Professional caulking: $100-500+ depending on scope
- Energy savings: Can reduce heating/cooling costs 10-15%
- ROI: Often pay for itself within 1-2 years
Interior vs. Exterior Caulking
Interior: Use acrylic latex for easy cleanup and painting
Exterior: Use silicone or polyurethane for durability and water resistance
When to Call a Pro
Professional caulking may be worth it for:
- Large exterior jobs (full house wrap)
- Hard-to-reach areas
- Multiple story application
- Specialized materials
Small caulking tasks around your home? You can handle these yourself. Larger sealing projects? Contact Grandmas Boys Handy Man Service for professional results!
TAGS
home maintenance sealing energy efficiency weatherproofing